Showing posts with label Sweet n' Sassy Stamps. Show all posts

Tuesday, January 5, 2016

SCS Hope You Can Cling To Challenge Cards from October 2015

I can't seem to get up from my computer at the moment so I might as well post some more while I'm here!  I could be working on a card right now, ha, or reading a book, hmmm, but nahhhh, let's post some more cards!  Here's a collection of cards I made for some of the October HYCCT challenges on Splitcoast Stampers. This is done in honor of Breast Cancer Awareness and we send the cards to MD Anderson in Texas where they make them available to patients and their family members to send or give out.

There were 40 challenges this year!  I didn't get all of them done for the month but I did have some fun with a few.  I always look forward to this event every October.  It seems to jump start my creativity after months of not making anything, just in time to think about & make holiday cards.  On to the cards!!


Challenge: Stop & Smell the Roses - use roses.  
Stamps: Close to my Heart-Floral Happiness    Ink & Paper: Stampin'Up!  
Other: Misti, scissors to fussy cut, foam tape to pop up flowers, glue


Challenge: Finish Line - include a hand draw a line & have something crossing it
Stamps: Sweet n' Sassy Stamps-Cute Critters   Paper: DCWV   Ink: Versafine, Tombow markers  
Other: pen & ruler to draw finish line and border around sentiment
Teehee, I cracked myself up with this one, thanks to SNSS critters.  Hopefully some little boy will enjoy this. : )


Challenge: use the Wrinkle Free Distress technique
Inks: TH Distress Ink pads    Paper: Shimmer paper for die cuts
Other:  Taylored Expressions-Silhouette Stems 3 die, Memory Box-Sketchbook Love die

I smeared a stripe for each of 3 color pads onto my craft mat, spritzed it with a water mister then swiped the paper thru it a few times to pick up the ink creating a background.  I could keep doing this, it was fun!


Challenge: Strengthen the designer paper - embellishing it.  
Paper: DCWV-Cafe Mediterranean   Other: McGill Tag punch, Taylored Expressions-Hello die, brad, 
Sakura Stardust pen (used on white flowers), foam tape
I cut out spare flowers and popped a few of them up on the background (white) and glued some of the blue flowers to the tag : )


Challenge: Strength in Numbers-use masking technique to make a group of people or animals
Stamps: Great Impressions-Fish (single fish with air bubbles), Hero Arts-sentiment
Ink: Versafine, Tombow markers  Other: Spellbinders Rectangle die, Clear window plastic (fish tank window), 
Stamp-a-ma-jig (to make a pool of fish with one fish)!


Challenge: Pretty Tattoo - use image and or words that would make a pretty tattoo
Stamps: Misty Mountain Rubber Stamps-flower, Art Impressions-sentiment    Ink: Versafine, Tombow markers  
Other: CB Distressed Stripes EF, foam tape


Challenge: Create a cure - make a colorful background using the Salting Technique
Stamp: Hero Arts-sentiment  Inks: Versafine, Artist's Loft pearlescent watercolors  Paper: DCWV, Shimmer paper for die cut, Watercolor paper for background   Other: Spellbinders-Butterfly Magic die, Kosher salt,  water mister

I didn't get the paints very wet so I had to mist the paper well before shaking the salt onto it.  The salt absorbs the water (thus some color) leaving a speckled background.  I really did not like this background using the pearlescent wc paint but I couldn't find my other watercolors and I didn't have time to play with this technique more before the challenge period ended.  I tried to pretty it up using the die cut. : )


Challenge:  I am a warrior - create a card that shows strength or inspiration
Stamps: Our Daily Bread Designs-Keep Climbing & Mountain sets  Ink: Versafine-black & blue, Memento-brown
Basic, but colorful with the layering, inspiring, may be masculine tho I wouldn't mind receiving it. :)


Challenge: split the difference- make full card front and split it with a sentiment strip.
Stamp: Stampendous  Ink: Versafine  Other: Memory Box - Reverse Butterfly Collage, Faber-Castell Gelatos & water, 
Perfect Pearls mist (to perk up the otherwise stark black background!)
I love this Reverse Butterfly Collage die, so much easier to adhere down than the intricate butterfly die I used on another card (below)!  The sentiment I cut by hand into a banner of sorts.  I didn't want to cover too much of that background. :)


Challenge: Thank Pink - make a pink thank you card
Stamp: SU Vivid Greetings  Ink: SU  Other: Memory Box-Fancy Blossoms flower die, Stickles, foam tape


Challenge: Orange you glad...? Make a card using Orange 
Paper: Core'dinations  Dies: Taylored Expressions - Curly Swirlies, Little Yellow Bicycle-Hope
Hmm, I should use orange more often, I think I like it. : )
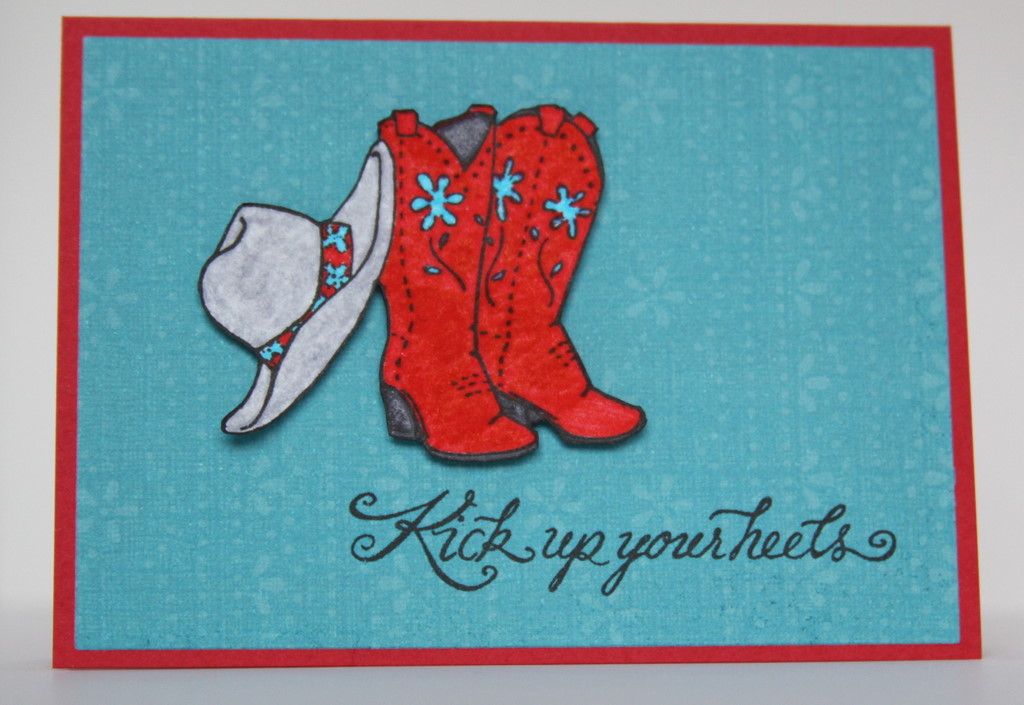


Challenge: Trash Cancer - use an item to represent each letter in the word TRASH.  
Here I used Teal/Turquoise color, Red, paper with applique background (?!), a sentiment and a hat!
Stamps: Great Impressions  Ink: Versafine, Tombow markers  Paper: K&Company  
Other: scissors to cut out image, foam tape to pop it up  : )


Challenge: Thanks Bunches - use masking to make a bunch of something
Stamps: River City Rubber Works-Tulip bunch topper (clear acrylic stamp), Unknown-pot with bow (red rubber on wood mount), Stampworkz Crafters Companion-sentiment  Ink: Versafine, Tombow markers  Other: Stamp-a-ma-jig, 
scrap & scissors to make a mask of the bunch of tulips

Ha, Good Golly, looking at this now, several months later, how did I do this?!  It was a challenge, and I only made one card, I remember that much!  Notice the flowers & pot are 2 separate stamps and 2 different types, one clear, the other not!  One pot with one collection of tulips apparently wasn't "a bunch" enough for me at the time, I must have been feeling creative that night!  Anything to add to a challenge for myself! : )


Challenge: Relationships matter - card representing this
Stamps: Great Impressions-image, Sweet n' Sassy Stamps-sentiment  Ink: Versafine, Tombow markers, 
Sakura Stardust pen  Other: CB-Baby's Breath EF, May Arts Ribbon


Challenge: Hearts for Hope- use 3 hearts and some red : )
Dies: Sweet n' Sassy Stamps-Bottom of my Heart,  Cuttlebug-Love Language sentiment, Diamonds in the rough EF


Challenge: Can I get a ride? - use image of mode a of transportation
Stamps: Great Impressions-bicycle, CTMH-sentiment  Ink: versafine, Tombow markers, 
Sakura Stardust pen (traced sentiment, accent flowers)  Paper: DCWV


Challenge: Food for the Body & Soul - something sweet!
Paper: Kathy Davis-Hello Sunshine   Stamp: SU Watercolor Words    Ink: Versamark  
Other: Moon Glow EP - 2 tone Midnight Sapphire & Obsidian, Foam tape (pop up extra cupcake)
I love the look of this 2 tone EP, straight on it looks black so had to angle it so you could see the beautiful blue!!  It really helps the sentiment pop on that busy paper!


Challenge: Light Days - use the ombre technique to make a background
Ink: SU Cameo Coral reinker  Paper: Watercolor, Shimmer for die cuts  
Dies: Memory Box - Waltzing Butterflies, Sketchbook Joy

Wet watercolor paper with water mister, spread with brush.  Drip reinker on acrylic block, use brush to add color to wet watercolor paper, starting at one end and spread back and forth working way down the page, allowing color to get lighter toward opposite end.


Challenge: Candy Striper Comfort - use red & white stripes
Paper: Penny Black-Madison, Silver shimmer paper (curly swirly)  Other: Taylored Expressions-Curly Swirlies die, 
Little Yellow Bicycle-Love die


Challenge: First class, no extra postage needed, bonus use postage like images
Stamps: Make an Impression-postage stamp, unknown maker of cube stamp of Christmas images  
Ink: Memento, Tombow markers, Versamark  
Other: Stamp-a-ma-jig (to place 4 postage images as close together as possible like a sheet of stamps), 
Sakura Stardust pen to accent images, Roller to apply layer of Versamark over whole thing, Clear EP for a nice shiny & sealing layer 

Whew!  Ok, maybe I should have split this up into a few parts.  This review makes me want to go play, but sadly, I think it's time to call it a night.  Besides, it's time for me to "move aaawaay from the computer"!  Break away from staring, unglue from my seat and back it up & out!  Good night!

Thursday, September 19, 2013

SSS228 Fall Playful Kitty


A fun sketch from The Sweet Stop


Stamps: Sweet n' Sassy Stamps-Pumpkin Kitty, Be Encouraged      Paper-DCWV Fall Stack    
Ink: Versafine Black Onyx, TH Distress Ink Dusty Concord     Other: Spellbinders-Squares, Prismacolor Pencils

The full image of the stamp used here is a kitty popping out of a pumpkin.  I carefully inked the head, paws & tail to stamp in various positions on the squares.  I stamped a couple of extra images on scrap, one to use as a mask to sponge the background purple to match the fall paper.  The 2nd was to cut out the tiny paws to glue on the center square, like he's holding onto the edge.  Since this wasn't intended to be a Halloween card, with the typical black cat, I left the kitty white, adding touches of color with pencils. Quick & easy, compared to coloring a black cat anyway!  Hmmm, could this be considered a contra-Halloween card? White cat, "be not afraid", with the cheery color combo?!  Or a just a fall colored kitty card?  I did stamp the full image of the kitty in the pumpkin on the inside of the card. I think he's cute. :)

Thursday, September 12, 2013

SSS227 Trust in the Lord


Another fun sketch from The Sweet Stop


Stamps: Sweet n' Sassy Stamps-Landscape Silhouettes, Our Refuge        Paper: K&Company super stack   
 Ink: TH Distress Ink-Antique Linen, Frayed Burlap, Black Soot, Versafine-Black Onyx  
Other:  Spellbinders-Circles, SU-Square punch

Wednesday, September 11, 2013

Thinking of you Cocoa wishes with Blue Poppies


Stamps: Great Impressions (bear), Biblical Impressions (ToY)    Paper: Echo Park, DCWV     
Ink: Memento-Tuxedo Black, Spectrum Noir alcohol markers    Other: Deckle Edge scissors 

Hello!  Thinking of you!  I have a few minutes before my bed time and since the hubby is already sleeping, I can't craft up there, so I thought I'd pop in here for a quick post!  I made the above card for hubby several months ago.  I think this is one of my first attempts at coloring with my new Spectrum Noir markers.  Oooo, that reminds me.  I received an email notice from Crafter's Companion announcing their release of redesigned Spectrum Noir markers on October 1st!  Some of the changes include: new shape, reformulated ink, and compatibility with a new brush nib (sold separately)!  They say they will still carry the refills & nibs for the old style tho they won't sell the old design after Sept 14. Whew, 'cause I think I have the whole set (darn it!). Here's a link to their store & announcement.  
__________________________________________________________________


Stamps: Sweet n' Sassy Stamps - Sweet Cocoa & Hot Cocoa Sentiments digis    
Ink: TH Distress Ink    Paper: DCWV, BoBunny    
Other: Spellbinders-ovals, wonky rectangles, MS Snowflake punch, Prismacolor Pencils

I made this for the Sweet n' Sassy Stamps September release challenge to use a warm beverage on a card.  They have a line of cute Cocoa the Mouse stamps & digital images.  I had this one I thought was appropriate. : )  I'm not ready for winter or snow yet!  We are into Fall here in AK; raining every day, leaves are turning colors other than green, temps are dropping; definitely cocoa (& hot tea) time for me!
________________________________________________________________


Stamps: Sweet n' Sassy-Poppies digi    Papers:  DCWV    
Other: Spellbinders-ovals, Prismacolor pencils, Eyelets

Here is the 2nd of 2 blue poppy images I had colored a couple of weeks ago. It was waiting to be matched with papers & assembled into a card.  I made this for the Sweet n' Sassy Stamps September release challenge to make a card using Blue, White and a third color.  My choice, green.  I was skimming through some old Splitcoast sketches and SC99 caught my eye for this image & the papers I wanted to use.  My adhesive wasn't sticking to the green glitter paper very well so I dug out my stash of eyelets to anchor the corners down. I have a rather large stash, I need to use them more often... : )

Good night!

Friday, August 30, 2013

Blue Poppies and The Sea

WhooHoo. I got 2 1/2 cards made this past week.  My neighbor grows blue poppies, they're almost 3 feet tall!  They were my inspiration to color a couple of  my digi poppy images from Sweet n' Sassy Stamps  and I used this week's sketch from The Sweet Stop SSS225  for one of them.  (The other blue poppy card is not finished yet.) 


I love how it turned out with this color combo!  (You can click on the image to make it bigger.)


Stamps: Sweet n' Sassy Stamps-Poppies (digi), Our Daily Bread Designs-Crochet Border    
Ink: TH Distress Ink-Salty Ocean, Faded Jeans, Antique Linen     Paper: K&Company, DCWV     
Other:  Prisma Colored Pencils, Sponge daubers, Seam Binding, water spritzer. Spellbinders-Ovals, 
Floral Oval dies, ODBD-Crochet Border die, Bow Easy

I used TH Distress Ink pads in Salty Ocean & Faded Jeans to dye the seam binding the shade I wanted it.  It was fun to do & I had blue fingers for almost 2 days. :)  Yes, I could have, and probably should have, used a baggie or a plastic glove on my hand but I was too lazy (?) to go down to the kitchen to get one. Well, more like impatient to get on with the fun!  The next day I received a few comments about my 3 dark blue finger tips from co-workers (You didn't get that from gardening...no that would be a green thumb, this here's a blue one, from inking! haha Huh?!), from an auto parts store clerk (like he hasn't seen filthy hands, well, just not blue ones) & from my hubby (They look dirtier than mine after working on my truck, use a scrubber like I do! Really?).

I had worked on this card over several days, and was finishing it up Thursday morning.  My hubby was packing up to go off to work for a few weeks and I had a few hours until we needed to head into the airport.  He called up to me, "are you working on a card for me?!"  Umm, hmm, "Nooo, I'm finishing up another card", I replied as tinges of guilt creep in, helped by his "ohhh" response. Thoughts running through my head: I didn't make him an anniversary card last week, and now he's taking off for a few weeks; he says he likes it when I leave him a note in his bag, which I haven't done in months (?)...oh boy... So I grabbed some stamps, think quick but don't overthink, or nothing will get made!  My inspiration - he's going to be on a ship at sea in the far north (tho not a sail boat like the image I used).  This is what I came up with, and handed to him as I chased him out the door to the waiting vehicle.  Wheewww!  Love ya dear!


Stamps: Sweet n' Sassy Stamps-The Sea      Ink: Versamark, TH Distress ink-Stormy Sea, Antique Linen     
Other:  Judi kins Embossing Powder-Lapis Lazuli (image), Ranger Super Fine Detail EP Black (sentiment) , sponge daubers

The JudiKins EP "Lapis Lazuli" is a mix of a dark blue & a bronze colored powder.  I hadn't used that EP in years and I wasn't sure what look to expect using it with this silhouette image. I just jumped in & tried it, no hours of hesitation....and, well, it gives it an interesting look!  I added a little sponging (maybe not enough) and called it good.  More like hubby called it time to go, so done it was!  

Sunday, August 25, 2013

Cards

Here's a few cards I made back in July.


Using the above Sweet Stop sketch from July 6 I made the butterfly card below.  It was an experiment stamping the line image on the bold floral print.  As it is with experiments, sometimes when I look at it I like it, other times not so much. :)


Stamps: Sweet n' Sassy-Butterfly Flourish, Inkadinkado-Creative Words set    Ink: VersaFine Black   
Paper: ki memories, DCWV    Other:  Spellbinders-Wonky Rectangles die,   Cuttlebug EF-Cane Back Chair, 
Black EP,   Flowers-JoAnn's & Bazzillbasics, flower brad
_________________________________________________________________

Next, is the card I made for this Flourishes July Release Challenge - It's Sketchy  with this sketch and a window of any shape.  Most people made a window card (image stamped inside) so I went for something a little different, (more literal ?) using my new window dies from Memory Box!


Stamps: Sweet n' Sassy-Be Encouraged      Paper:  DCWV,  Vellum 
Ink: TH Distress Ink- Tea Dye (brick EF), Versafine-Vintage Sepia (sentiment)       
Other: Sizzix EF Brick Wall; Memory Box Dies-Small Madison Window, Small Flower Box, 
Fairytale Flower Border; MS Branch punch; Clear plastic- repurposed packaging; Stickles 

I inked the brick ef to help it show up on the patterned paper. You almost can't really tell what the original paper looked like now (it would be the embossed color tho it doesn't look quite the same) but I like the effect! Behind the window frame is pale yellow cardstock, then vellum, topped with clear plastic. Yes, cutting through all those layers to place it in the corner of the card was a pain!  The MB Fairytale Flower Border die was used with green, yellow & red cardstock.  The colored flowers were snipped & glued onto the green die cut, then the green cut apart and arranged in the flower box. I thought it would save me work to do it this way rather than use separate punches or other small dies, but I'm not so sure anymore! 
____________________________________________________________________

This next one is a wedding card for a gal at work.  Her favorite color is pink, followed by anything camo.  I really wanted to do something in pink camo but it didn't seem to work for me. Her girls wore pink dresses and her wedding bands have beautiful silver sparkle so for her card I went with pink & silver, simple style with alittle sparkle.


Stamps: Stampin'Up-Soft Swirls, Penny Black sentiment    Ink: Ranger Acrylic Paint dauber-Silver, Versafine-black, Versamark     Paper: echo park-Love Story pink    Other: Tim Holtz ideology Grunge Paper, Spellbinders Hearts die, eksucess corner rounder punch, Recollections Sparkle EP-Clear Silver, KaiserCraft-large pearl brad, 
pink flowers, Stickles, Offray ribbon

The heart was die cut from the grunge paper, (like light weight cardboard with a soft, velvety texture on one side) then coated with silver acrylic paint. I think coating that soft texture gives it some depth vs. using smooth cardboard. I added Stickles to the flowers & around the brad to add more sparkle.

Off to finish up another card!

Wednesday, August 21, 2013

Sweet n Sassy Stamps Sketch 224 play time

Yikes! Has it really been a year since I posted anything on here?!?!  I've gotten spoiled using SCS to upload cards made for challenges to quickly link up minutes before their deadline, the rare moments I do play these days.  Well, I'll try to do a quick post & hopefully get back in the groove of writing here!

Sweet 'n Sassy Stamps posts weekly sketches on their The Sweet Stop blog.  I always hope to play along but the week seems to fly by. Next thing I know they're posting another one!  This time I had started a card for one of their monthly stamp release challenges and didn't finish it in time (due last Fri night).  Saturday morning they had a new sketch posted so I used it as my inspiration to finish the card.  Otherwise it would end up being added to the growing pile of bits & pieces of unfinished stuff...  This sketch also had a spin to use sunflowers, so to fulfill that part of the challenge I had to make another card! And finish & post them before the next challenge, whew!

Here's the sketch I used:


It's been dark, cloudy & rainy here these past few days, so the pictures are not great at showing the true colors. Here's my first card:

Stamps: Sweet 'n Sassy Stamps-Landscape Silhouettes, Be Encouraged           Paper: DCWV

The paper was cut from a big scrapbook sheet that had a big swirl of sparkle, so no particular shape but I thought it added something here. :) 

Here's my second card using the sketch & Sunflowers:


Stamp: Penny Black             Paper: DCWV              Ink: Tombo Markers, TH Distress Ink
Other: Cuttlebug EF Leafy Branch, hole punch, Sakura Stardust pen, Glossy Accents

I colored - thumping & mixing colors, directly on the rubber stamp with markers, stamping & repeat until I got the image I liked.  (only took 3 tries, whew!)  Since I didn't have brads or other embellishments I liked for this I made my own brad-looking ones.  I used the green paper (yes, it's really green, looks better in real life) of the banner, hole punched circles, colored with the Stardust pen to add sparkle, then covered with Glossy Accents (the not so fun part - fighting with small circles & sticky glue, grrrr).  Once the glaze was dry  I was able to stick them on the card.  The smart thing to do would have been to stick the hole punched circles to the card before coloring & adding the glaze...but I didn't know for sure I would use them until I saw them finished....not to mention I didn't think of this till just now, while typing this (roll eyes, sigh)...

Thanks for looking!  Off to do the many things that keep me from posting here. Like sleep, for now :)

Monday, August 20, 2012

SSS171 and SNSDC66 Purple Poppies

The Sweet n' Sassy Digi Challenge for Friday is to use Greens & Purples with digital images and here's the  Saturday Sketch.  Not having much time or creative energy to make multiple cards, I combined them again this week!


After looking at images on the computer, I colored the Purple Poppies digi-stamp with pencils. Purple poppies do exist!  Not that it mattered that much but I was curious otherwise all I could think of were purple pansies but I didn't have a digi stamp of pansies!  Back to the card, the purple oval & the heart button are popped up with foam tape.  I typed the "Happy Birthday!" in a Word document using the Curlz font and carefully printed it out (took 2 tries) on the patterned paper, then cut & curved it into a banner.

Stamps: SNSS Poppies digi stamp
Paper: DCWV
Accessories: Prisma pencils, Spellbinders Classic Oval dies, Cuttlebug EF Floral Fantasy, ribbon, Dress It Up silver heart button


Sunday, August 19, 2012

SSS170 and SNSDC65 Challenges with Rhubarb Bear


Yes, a Christmas card in August!  I made this card to cover 2 challenges from Sweet n' Sassy Stamps.  The Aug 3rd Friday Digi Challenge SNSDC65 was "Beary Special", to use bear image or elements, and digi stamps.  Below is the Aug 4th Saturday sketch SSS170 that I used.


The image is Rhubarb's Gingerbread Man, one of  Rhubarb the Teddy Bear images available as a stamp and as the digi image I downloaded from Sweet n' Sassy Stamps.  He's colored with Tombow markers with alittle glaze pen touch on his nose & on the cookie's decorations.  The bow is made from white seam binding that I dyed with Ranger TH Distress Ink pads.  I started with Peeled Paint, it was too yellow so I added Pine Needles but that was too dark & bluish.  I dabbed some of it off with a damp paper towel and it didn't look too bad wet, at 12:30 at night under a spotlight, in an otherwise dark room.  But this is the shade I awoke to when it had dried.  Back to the yellowish tinge yet edged with the darker green.  Kinda cool yet not quite the shade I wanted here.  It's looking a bit brighter in the picture above then it looks in real life, I think....  It was fun, and it took a little more than a day of washing my hands to get the green off my skin.  Next time maybe I'll remember to use plastic baggies on my hands or something. : )

Stamps: SNSS Rhubarb's Gingerbread Man digi, ODBD - sentiment
Paper: DCWV
Ink: VersaFine-Sepia, TH Distress Ink-Peeled Paint & Pine Needles to dye seam binding, Tombow Markers
Accessories: White Seam Binding, Glaze pens, brads, Spellbinders Oval, CB EF Distressed stripes

Sweet N' Sassy August Release challenges


Hello!  Thought I'd do some catching up on my posts here.  The Sweet n' Sassy Stamps Release party was a couple of weeks ago and I had uploaded these to Splitcoaststampers to get them submitted in time.  Blog land was forgotten for awhile.  But now, company has come & gone, hubby's at work and I'm home fighting a cold, what better thing do I have to do (other than make another challenge card)?  : )


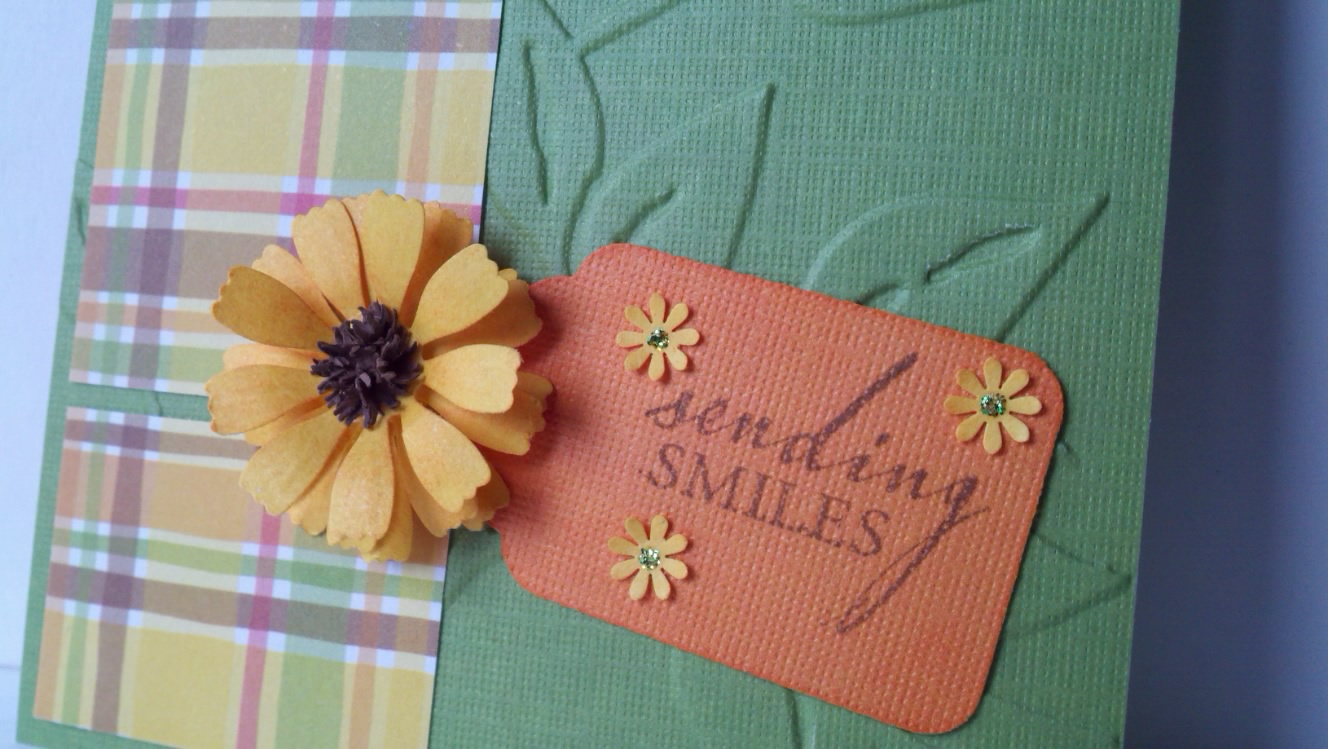
This card was for the Color Combo Challenge - Green, Orange & Yellow.  The plaid paper is from an old set made by DCWV.  I trimmed out the bold pinkish red strip leaving the 3 pieces shown here just the right size to glue down on the embossed green base.  I wanted to play with some of my punches and make a flower using a technique Loll shared here for the center - with several small or mini (depending on size of flower) sun punch outs, cut into center then roll it into a cone shape.  Glue 5-6 of these sunny cones into the center of the flower for desired fullness.  

Stamps: Hero Arts
Paper: DCWV
Ink: VersaFine Sepia
Accessories: Punch Bunch Sunflower, Mini Sun, Mini flower, McGill Tag punch, Stickles, Cuttlebug EF Leafy Branch


This card was for the Sketch challenge.  Hmmmm, nothing to say here.  I like the peachy paper.  Needs something, some would probably put pearls or ribbon on it but I didn't have any that went well with it.

Stamps: SNSS Flower Sentiments digi
Paper: KaiserCraft
Accessories: Sizzix Branch w/Leaves die, Spellbinders Classic Oval & Lacey Oval Dies, MS Doily border bunch


This card is for the CAS challenge - use Kraft on your card and for the Product challenge - use buttons & brads.  Tho, when I was making it late at night, I didn't remember the AND part so it only has a button (and a charm...). : }  I embossed the Kraft paper then rubbed white chalk ink over it to bring out the embossing.  The butterfly charm I picked up at a garage sale of a former scrapbooker and I was able to carefully cut off the ring/charm attachment, looks so much better!

Stamps: Memory Box
Paper: DCWV
Ink: VersaFine Majestic Blue, VersaMagic Cloud White
Accessories: Cuttlebug EF Textile, Button, floss, Butterfly Charm


This card is for the Inspiration challenge - a photo of a white wall with large chevron pattern on it and a couch with lots of pillows & accessories all with colorful chevron (zigzag) patterns on them.  With no zig zag stamps in my stash, my collection of baby ric rac came to mind.  I think I've got one too many rows here, almost ran out of room for the sentiment box.  Kinda different yet fun!

Stamps: Hero Arts
Paper: DCWV
Ink: Memento
Accessories: Wrights Baby Rick Rack, gems, Spellbinders Square dies, Corner Rounder punch

Monday, July 23, 2012

SSS168 Sweet n' Sassy Sketch & SNSDC62 Digi Challenge


In between cleaning projects I was able to make another card this weekend. Still have much cleaning to do, tho not absolutely necessary...(right?!).  My inlaws are coming to visit for a few weeks, we pick them up at the airport tomorrow night.   I picked up hubby at the airport tonight, he went straight to bed after being up almost 30 hrs! So here I am, in the quiet of the night, posting pics of a sketch challenge & digi challenge card I made last night. :)  I had hoped I could make a more Christmas-y card for the Digi Challenge - Christmas creations, but I don't think that's going to happen this week so I'm using this card for both challenges.


Here's my card using the sketch and Sweet Cocoa Mouse digi-stamp from Sweet n' Sassy Stamps.  Sweet n' Sassy Stamps is celebrating Christmas in July with some new pre-releases, a sale ('til July 25), a clear stamp blog hop and a Digi-stamp blog hop.  That put me in the mood to do a winter theme card for the sketch this week!  I had originally cut the image as a square but I didn't like how my coloring of the background was going so I cut her out completely and popped her up here!  Wow, these papers are still kind of overwhelming to me, not my usual style but thought I'd give it a try. The papers are from an old DCWV Winter set.


From this angle you can see that I used Glaze pens on the candy cane (over the marker coloring), a white Souffle pen on the little marshmallows, a StarDust pen on the mug flakes and Glossy Accents on the rim, base & handle of the mug!