Tuesday, January 5, 2016

SCS Hope You Can Cling To Challenge Cards from October 2015

I can't seem to get up from my computer at the moment so I might as well post some more while I'm here!  I could be working on a card right now, ha, or reading a book, hmmm, but nahhhh, let's post some more cards!  Here's a collection of cards I made for some of the October HYCCT challenges on Splitcoast Stampers. This is done in honor of Breast Cancer Awareness and we send the cards to MD Anderson in Texas where they make them available to patients and their family members to send or give out.

There were 40 challenges this year!  I didn't get all of them done for the month but I did have some fun with a few.  I always look forward to this event every October.  It seems to jump start my creativity after months of not making anything, just in time to think about & make holiday cards.  On to the cards!!


Challenge: Stop & Smell the Roses - use roses.  
Stamps: Close to my Heart-Floral Happiness    Ink & Paper: Stampin'Up!  
Other: Misti, scissors to fussy cut, foam tape to pop up flowers, glue


Challenge: Finish Line - include a hand draw a line & have something crossing it
Stamps: Sweet n' Sassy Stamps-Cute Critters   Paper: DCWV   Ink: Versafine, Tombow markers  
Other: pen & ruler to draw finish line and border around sentiment
Teehee, I cracked myself up with this one, thanks to SNSS critters.  Hopefully some little boy will enjoy this. : )


Challenge: use the Wrinkle Free Distress technique
Inks: TH Distress Ink pads    Paper: Shimmer paper for die cuts
Other:  Taylored Expressions-Silhouette Stems 3 die, Memory Box-Sketchbook Love die

I smeared a stripe for each of 3 color pads onto my craft mat, spritzed it with a water mister then swiped the paper thru it a few times to pick up the ink creating a background.  I could keep doing this, it was fun!


Challenge: Strengthen the designer paper - embellishing it.  
Paper: DCWV-Cafe Mediterranean   Other: McGill Tag punch, Taylored Expressions-Hello die, brad, 
Sakura Stardust pen (used on white flowers), foam tape
I cut out spare flowers and popped a few of them up on the background (white) and glued some of the blue flowers to the tag : )


Challenge: Strength in Numbers-use masking technique to make a group of people or animals
Stamps: Great Impressions-Fish (single fish with air bubbles), Hero Arts-sentiment
Ink: Versafine, Tombow markers  Other: Spellbinders Rectangle die, Clear window plastic (fish tank window), 
Stamp-a-ma-jig (to make a pool of fish with one fish)!


Challenge: Pretty Tattoo - use image and or words that would make a pretty tattoo
Stamps: Misty Mountain Rubber Stamps-flower, Art Impressions-sentiment    Ink: Versafine, Tombow markers  
Other: CB Distressed Stripes EF, foam tape


Challenge: Create a cure - make a colorful background using the Salting Technique
Stamp: Hero Arts-sentiment  Inks: Versafine, Artist's Loft pearlescent watercolors  Paper: DCWV, Shimmer paper for die cut, Watercolor paper for background   Other: Spellbinders-Butterfly Magic die, Kosher salt,  water mister

I didn't get the paints very wet so I had to mist the paper well before shaking the salt onto it.  The salt absorbs the water (thus some color) leaving a speckled background.  I really did not like this background using the pearlescent wc paint but I couldn't find my other watercolors and I didn't have time to play with this technique more before the challenge period ended.  I tried to pretty it up using the die cut. : )


Challenge:  I am a warrior - create a card that shows strength or inspiration
Stamps: Our Daily Bread Designs-Keep Climbing & Mountain sets  Ink: Versafine-black & blue, Memento-brown
Basic, but colorful with the layering, inspiring, may be masculine tho I wouldn't mind receiving it. :)


Challenge: split the difference- make full card front and split it with a sentiment strip.
Stamp: Stampendous  Ink: Versafine  Other: Memory Box - Reverse Butterfly Collage, Faber-Castell Gelatos & water, 
Perfect Pearls mist (to perk up the otherwise stark black background!)
I love this Reverse Butterfly Collage die, so much easier to adhere down than the intricate butterfly die I used on another card (below)!  The sentiment I cut by hand into a banner of sorts.  I didn't want to cover too much of that background. :)


Challenge: Thank Pink - make a pink thank you card
Stamp: SU Vivid Greetings  Ink: SU  Other: Memory Box-Fancy Blossoms flower die, Stickles, foam tape


Challenge: Orange you glad...? Make a card using Orange 
Paper: Core'dinations  Dies: Taylored Expressions - Curly Swirlies, Little Yellow Bicycle-Hope
Hmm, I should use orange more often, I think I like it. : )


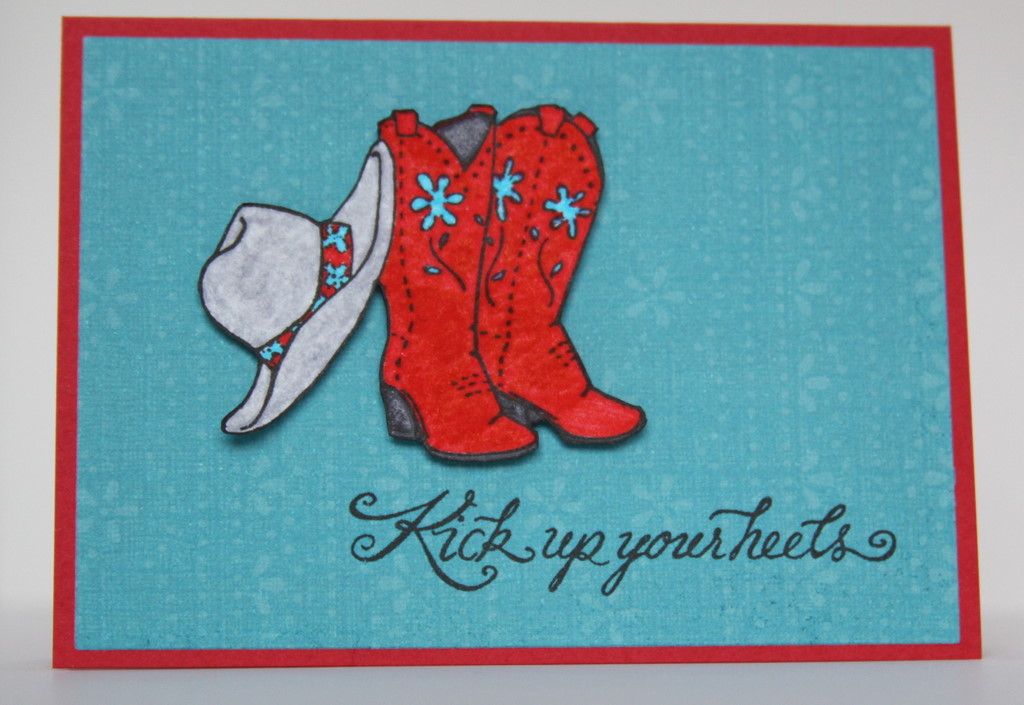
Challenge: Trash Cancer - use an item to represent each letter in the word TRASH.  
Here I used Teal/Turquoise color, Red, paper with applique background (?!), a sentiment and a hat!
Stamps: Great Impressions  Ink: Versafine, Tombow markers  Paper: K&Company  
Other: scissors to cut out image, foam tape to pop it up  : )


Challenge: Thanks Bunches - use masking to make a bunch of something
Stamps: River City Rubber Works-Tulip bunch topper (clear acrylic stamp), Unknown-pot with bow (red rubber on wood mount), Stampworkz Crafters Companion-sentiment  Ink: Versafine, Tombow markers  Other: Stamp-a-ma-jig, 
scrap & scissors to make a mask of the bunch of tulips

Ha, Good Golly, looking at this now, several months later, how did I do this?!  It was a challenge, and I only made one card, I remember that much!  Notice the flowers & pot are 2 separate stamps and 2 different types, one clear, the other not!  One pot with one collection of tulips apparently wasn't "a bunch" enough for me at the time, I must have been feeling creative that night!  Anything to add to a challenge for myself! : )


Challenge: Relationships matter - card representing this
Stamps: Great Impressions-image, Sweet n' Sassy Stamps-sentiment  Ink: Versafine, Tombow markers, 
Sakura Stardust pen  Other: CB-Baby's Breath EF, May Arts Ribbon


Challenge: Hearts for Hope- use 3 hearts and some red : )
Dies: Sweet n' Sassy Stamps-Bottom of my Heart,  Cuttlebug-Love Language sentiment, Diamonds in the rough EF


Challenge: Can I get a ride? - use image of mode a of transportation
Stamps: Great Impressions-bicycle, CTMH-sentiment  Ink: versafine, Tombow markers, 
Sakura Stardust pen (traced sentiment, accent flowers)  Paper: DCWV


Challenge: Food for the Body & Soul - something sweet!
Paper: Kathy Davis-Hello Sunshine   Stamp: SU Watercolor Words    Ink: Versamark  
Other: Moon Glow EP - 2 tone Midnight Sapphire & Obsidian, Foam tape (pop up extra cupcake)
I love the look of this 2 tone EP, straight on it looks black so had to angle it so you could see the beautiful blue!!  It really helps the sentiment pop on that busy paper!


Challenge: Light Days - use the ombre technique to make a background
Ink: SU Cameo Coral reinker  Paper: Watercolor, Shimmer for die cuts  
Dies: Memory Box - Waltzing Butterflies, Sketchbook Joy

Wet watercolor paper with water mister, spread with brush.  Drip reinker on acrylic block, use brush to add color to wet watercolor paper, starting at one end and spread back and forth working way down the page, allowing color to get lighter toward opposite end.


Challenge: Candy Striper Comfort - use red & white stripes
Paper: Penny Black-Madison, Silver shimmer paper (curly swirly)  Other: Taylored Expressions-Curly Swirlies die, 
Little Yellow Bicycle-Love die


Challenge: First class, no extra postage needed, bonus use postage like images
Stamps: Make an Impression-postage stamp, unknown maker of cube stamp of Christmas images  
Ink: Memento, Tombow markers, Versamark  
Other: Stamp-a-ma-jig (to place 4 postage images as close together as possible like a sheet of stamps), 
Sakura Stardust pen to accent images, Roller to apply layer of Versamark over whole thing, Clear EP for a nice shiny & sealing layer 

Whew!  Ok, maybe I should have split this up into a few parts.  This review makes me want to go play, but sadly, I think it's time to call it a night.  Besides, it's time for me to "move aaawaay from the computer"!  Break away from staring, unglue from my seat and back it up & out!  Good night!

Merry Christmas cards


I see it's been quite awhile since I've posted here so I thought I'd post a few of the Christmas cards I made back in December!  I seem to be a few years behind in using many of the Christmas/Winter stamps I acquire.  The last couple of  years I've looked at this cute polar bear & penguin stamp thinking, I really want to use this!  It has sat out on my table all this time (yes, years), patiently waiting, always smiling & waving at me, so this year I finally did!  


I made enough to color 2 of each scarf color combo except for one, but that's what I get for only stamping 11 images on just the right size scraps of cardstock and not finding another scrap handy to make an even number.  I left a few snow dots in the image un-inked to leave room to stamp the Merry Christmas.  Stickles were used to add sparkle to the snow and the ruff on the penguin's hat.  The patterned paper was chosen based on scarf colors and the layers I played with determined the size of the card.  This fulfilled my need for variety despite the initial assembly line intention. : )

Stamps: Image-Great Impressions, Sentiment-Taylored Expressions
Ink: VersaFine Onyx Black, Tombow markers, Stickles
Papers: DCWV, Penny Black, SU, Memory Box

_____________________________________________________________________________


Breaking my usual lag time in making cards with holiday stamps I acquire, these 4 cards were made with a set I just purchased in the last 3 months from Stampin' Up! I tried for some with a non-traditional background, but hey, they're still green, kinda homey. : )  The tree image with the words is stamped using Pearlescent Brilliance ink, giving it a nice little shimmer.  The lighter green stamped image on the lower left card is a second imprint.  I used the Stardust pen on the stars & on the string of red lights on the decorated trees to add some shine.

Stamps: Stampin' Up-Peaceful Pines  with Perfect Pines thinlits dies
Inks: Brilliance Pearlescent, SU, Sakura Stardust pen 
Paper: DCWV, K&Company

Well, I made another style of Christmas card also, but apparently I haven't transferred their pictures to my computer yet since I'm not finding them now.  I better post these anyway, otherwise another year may fly by before I do! : )

Saturday, March 1, 2014

I {Heart} ribbons cards


I saw a post the other day over on the May Arts Ribbon blog and was inspired after watching the video Latrice did making her Textured Valentine's Day Card Set.  I can imagine using different die shapes & ribbon colors for any season & greeting!  After shuffling through my partially organized ribbon stash & leafing through my die sets, I too settled on the heart shape and then a combo of blue ribbons with sprinkling of red. 


Here's my basics for my prototype card.


Ah, Kraft did not go well with this ribbon selection (esp. with the white & blue floral ribbon), so it's a speckled white (scrap from my Christmas cards!). As with any prototype I make, even tho I like it, I need to change it up a bit to make more than one!  I really wanted to use Kraft paper, like Latrice did, for something different for me and because I like Kraft with blue & red.  So that was my challenge to myself.  Back to the ribbon stash & playing with combinations. :)


The end result!  There's still some variations in the last 3 - angle of heart, order of ribbons and embellishment type. The Kraft was still an issue for me, by itself, but to tie it all together I used the next larger heart die to make a frame of blue and used the blue as the card base also.  The swirl stamp with white chalk ink helped to dress up the background.  

Now, who to send these to.... :-)

Paper: DCWV, JoAnns 
Ink: Memento Danube Blue, VersaMagic Cloud White Chalk ink    
Stamps: Autumn Leaves-Swirls, Love (word from I Love You) unknown
Tools:  Spellbinders Heart dies; Ribbons-various (JoAnn's, Michaels, Walmart), Puffy Hearts-May Arts Ribbon; Zip Dry Glue, Foam Tape, Heart rhinestones

Thursday, February 20, 2014

Playing with my Gelatos - card backgrounds

I did it!! I finally sat down & played with my Faber-Castell Gelatos! And one of my new Impression Obsession Cover-a-card Stamps - Tapestry!  I couldn't decide on just one set of colors or embossing powder to use, so I stamped 3 full 8 1/2 x 11 sheets of cardstock, divided them into quadrants (well, based on the C-A-C stamp edges) & played with a variety!


The sheet above was stamped with VersaMark & I used Clear Embossing Powder, so pretty! I colored areas of the image using at least 3 colors of Gelatos then used my fingers & water to blend the colors in that area.  As long as I wiped off my finger(s) (or used a different finger) for each color within the area I was able to keep a bit of each color bold rather than blending it all into one new shade/color.


This one is with Black Embossing Powder, so rich!  I had already cut into the red area to make a card before I thought to take a picture of this sheet. :)


This one is with Gold Embossing Powder and earthtone colors.  I left one full stamped area uncolored, so elegant!

These sheets sat for a few days before I got back to them.  Though dry, the colors could still be rubbed, blended and even come off, especially if the paper got wet again somehow (like in the mail). I dug out my  Micro Glaze from JudiKins I had bought a few years ago but never used & rubbed it on to seal them.  Then I cut into the sheets to make a couple of Birthday cards! :) 


Stamps: Impression Obsession Cover-a-card Tapestry; Stampabilities-HB on red; Great Impressions-HB on blue
Ink: Faber-Castell Gelatos, VersaFine Black Onyx (HB), Brilliance Pearlescent Sky Blue (HB)
Other: Embossing Powder - Fine Clear, Fine Black, Fine Gold; JudiKins MicroGlaze; May Arts Ribbon, blue brads

The Gelatos were so fun to color with! I love the bright colors & the different looks achieved just by changing the color of embossing powder.  Faber-Castell has a great blog with ideas, tips, projects & videos for using Gelatos and their other great crafty tools!

Thursday, January 30, 2014

Winter cards (belated Christmas cards)


I hope everyone had a blessed Christmas & Happy New Year!  I'm a bit behind in sending out my Christmas cards this past year.  I was tempted to hold these for next Christmas, but since I didn't send any out the previous Christmas (on a roadtrip in Mexico) I felt inclined to send them out. ;)  It didn't help that a bad cold hit me Christmas Eve, wiping me out for most of the next week. Every year, the week between Christmas & New Years seems to be the week I normally scramble to get them done but eh, not this year, errr, last year, uh, last month, right.

Since they were so late I wasn't feeling especially creative. I have a hard time making more than 6, 10 or even 3 of the same card, but I stuck with it this time. I finished over 20 of these, with just 2 variations of the same design. :) Simple and flat!  A few of my family members (as they will notice if they see this post) received completely different cards, cards that I had made earlier in the year, just in case I were to run out of these. :)

Stamps: Penny Black-Snowscape, Memory Box-wonderland sentiment
Ink: Fresco Chalk Ink-Indigo Velvet
Paper: DCWV, Xerox Flecs Cover (65# from office supply store)

Sunday, November 17, 2013

October HYCCT cards Part 2

Here's a few more of my cards for the challenges:

Sparkling Season - make a glittery holiday card. I used glitter paper for the punched snowflake, clear embossed snowflakes on the background and used a star dust pen on the dots of the sentiment to add sparkle.
Stamps: Penny Black-snowflake, PrintWorks-sentiment    Paper: DCWV-Linen closet-glitter & matte   Ink: Memento black, Versamark     Other: Clear Embossing Powder, EK Success large snowflake punch, Sakura Stardust pen


Keep it under wraps-decorate/alter a notepad. I liked the glossy brown cover this little notebook had so I just added a strip of pink polished stone background with this encouraging artsy Life stamp and foil (ish) butterfly stickers. The font really is like that. :)
Stamp: Stampendous    Paper: Glossy    Other: Alcohol, SU reinkers, Corner rounder punch, 
Studio C purse book, Sticker King stickers


Strength of Steel - use metal on card. I adhered a foil container cover (from prescription eye drops, a nice long rectangle) to cardstock then embossed it with a folder and colored with alcohol inks.
Stamp: Inkadinkado  Paper: DCWV  Other: Foil, Darice EF-Fall Leaf Background, 
Ranger Alcohol Inks, JoAnn's fall ribbon


Mixing it up-Mixed media. It was fun to pull out some of my different things I was hoarding to try something like this 'someday'.   I painted textured paper with the metallic acrylic paint, both sides, then let it dry for about 20 of the 24 recommended hours. It die cut & embossed nicely. The grunge paper (for sentiment) was painted with metallic pearl with dabber then smacked with the paint brush of the colors I used for the flower, as I finished painting each color. I had to use a stamp-a-majig to restamp the sentiment a couple more times to make it show up boldly.  It would take off some of the acrylic paint the first couple of times I had to peel the stamp off of it. The background was made with a stencil & Perfect Pearl mister in gold. I love the gold tone of the paint and the shimmer of everything, tho hard to photograph!

Here's a close up:

Stamp: Stampendous  Inks: Stazon (stamp), Lumiere Metallic Acrylic Paint-Met. Olive Green, Halo Violet Gold, Adirondack Met. Acrylic Paint Dabber-Pearl  Other: Spellbinders Poinsettia dies, Heidi Swapp Chevron Stencil, Perfect Pearls Mist-Heirloom Gold, Stickles-gold, May Arts black mesh, Gold wired fringe

Friday, November 15, 2013

October HYCCT cards

As most of you know, October is breast cancer awareness month. Splitcoast Stampers (SCS) sponsors a month long Hope You Can Cling To (HYCCT) challenge.  36 Daily card making challenges,  a few extra at the start & close of the month, are posted on their site.  The cards that are made for the challenges, plus any extra people want to include, are sent to MD Anderson, Univ of Texas, Cancer Center and are available to be used by the patients & their families.  The challenges are creative, fun and motivating, and all for a great cause!  The added incentive is even if you can only make one card and upload a picture of it to the SCS gallery, you're entered into a drawing for prizes donated by several different stamp companies.

Every year it's a challenge for me to find the time to participate, especially not till after 10/15 - the IRS tax extension deadline.  I don't think I was able to start this year till after the 22nd.  But with late nights & trying not to overthink it, I actually got all 36 challenges done!!  It helped that they give us till midnight (9pm AK) on Nov 7 to upload pics.  Another big (added) challenge is that since MD Anderson is associated with the state of Texas, we are not allowed to use Bible verses or anything religious on the cards.  We can use the word 'faith' but in the general sense, not tied to any one religion.  That always cuts out most of my word/sentiment stamps!

I've read that about 215 people participated this year and over 4600 cards were sent to MD Anderson!  I'm still slowly working my way through the gallery of challenge cards, viewing everyone's creative interpretation of the challenges, so inspiring!

Here's a few of the cards I made (with the challenge listed first):

Colors of Cancer: use colors representing cancers family & friends have had. I used Pink-Breast, Dark Blue-Colon, and Black-Melanoma
Stamps: Hero Arts-saying, Sweet n'Sassy Stamps-New Beginnings butterflies & dies, Bo bunny denim paper

Hope you have a great day - make them smile or laugh, a cheery card. I used an old sketch SC38 posted on SCS as my layout.  
Stamps: Rubber Stampede-bee, Memory Box-saying; Spellbinders circles, Stickles for the wings

Use a message or image to reflect a message to or from a group of people, to send & receive a group hug. The EF was inked up before embossing. Glimmer Mist was added to give it a shimmer/sparkle. Flower brads embellish as well as help hold the sentiment down, in case the adhesive doesn't stick well on the embossed/misted background. :)
Stampendous stamp, Spellbinders Labels 18, Cuttlebug EF Bit of Paisley, SU ink, Glimmer Mist,flower brads


I heart you - make a heart shaped card or a card with hearts.  :)
Spellbinders hearts, Cuttlebug Love Language die, Stickles


Warm & Furry Fuzzies - use an image with a furry animal :)
Stamps: Crafters Companion, Mulberry Wood-Gone Fishing colored with Tombow markers


Peace & quiet, no words, just an image.  Wonderfully simple, and blue to add to the peaceful image. :) Stamp-Impression Obsession


Sending Flowers - Flowers are my favorite stamp image yet I decided to use some 3D flower stickers I had in my stash for this challenge! I loved the soft yellow of the flowers, paired it with my leafy die on an earthy base with corresponding sentiment. :)
Stamp-Printworks, Memory Box-Fresh foliage die, Jolee's Boutique flowers


Bursting with hope, create a Starburst/Sunburst with papers, not stamps or ef.  My horizon wasn't straight so I kept adding paper rays. :)  I can email the tutorial that was provided, but it also helped me to watch a video of the technique on YouTube 
Stamp-Morning Star Stamps, Paper-DCWV Fresh Floral


Make a pocket full of hope, in pink or orange with hearts or stars
Stamp-Inkadinkado, Paper-BoBunny, DCWV, McGill round envelope punch, Spellbinders-hearts, 
Cuttlebug EF-language of love, ribbon, brad


Peaceful Leaves.  I just had to look outside to be inspired for this, swirling fall leaves!  
Endless Creation-stamp, Darice EF-Fall Leaf Background, McGill-Oak leaf punch, 
corner rounder, TH Distress Inks, sponges


Use the KISS technique- adds texture to solid stamps.  KISS also stands for Kindness in Showing Support. (HA, probably not what you thought I was going to say!)  I used a stamp combo (the block background and flowers) I had used years ago, when my Mom & sisters were just showing me the fun of stamping (1998?!).  I smooched the block background stamp with a new to me checkered background stamp, trying a few different soft color combos before settling on this one. :) 
Stamps: Hero Arts-blocks, Poppy Stamps-checkered background, Rubber Soul-vase of flowers, 
Memory Box-ToY; Hero Arts shadow ink, Memento Black


Stand Tall - tall/skinny card.  I had some tall floral stamps that I thought of immediately for this challenge. I colored the rubber with markers, huffed & stamped!  It was a bit of a challenge to color red rubber with markers that barely showed, or looked like the ink dried right away, hoping I wasn't going to end up with a putrid mud color or something!  Thankfully, with much huffing & puffing, this came out on the first try. :)
StarvingArtistamps-Backlit Blooms Orchid, Tombow markers


Black & White card with a pop of color.  I always enjoy seeing cards like this made by others so thought I'd play with tape & inky sponges myself.  Thankfully the 'removable tape' only tore the card near the opening edge so I could trim it off.  The black did not stamp as solid as I liked but I found a black Zig pen that matched and touched the image up a bit. I think it added some texture/dimension! :)  
Sweet n'Sassy Stamps-Landscape Silhouettes, Memento blues, Versafine black


Let's punch out breast cancer - use punches and or dies.  My sister had punched a bunch of these 6" squares with the WRMK corner punches for me so using this makes for a big card!  The flower die was just a big so it fit just right, after trimming the stem. I have seen a few people make bows with brads, it's not easy tho. Darn tiny brads with stiff ribbon, lots of tugging & twisting but I like it!
We R Memory Keepers Mini 8 punch-Vine, Memory Box die-Bella Bouquet,
 DCWV- Fresh Florals paper, Stickles, Ribbon, brad


 Inner Strength - use a dimensional image on the inside that can be seen from the outside.  I embossed the Love You stamp & added a heart shaped rhinestone on the inside.  The embossed cover was sponged with pink and several hearts highlighted with pink Stickles.
Stamp-PSX, The Paper Studio EF-Doodle Hearts, Spellbinder Heart die, Stickles, Clear EP, Rhinestone heart


It's a cover up - with a hidden message to be uncovered not just by opening the card.  My extra front flap became a front pocket on my card when I taped the 3 sides shut!  That's what I get for not having a clear picture in my mind (focus!) as to what I was going to do.  I like the pocket (tho a bit big) so went with it & made a tag with the 'hidden message' to put into it.
Stamps: Sweet n'Sassy Stamps-Wildflowers, SU-friends saying; Paper-DCWV Fresh Florals; 
Deckle Edge scissors, tag die, ribbon